Blog articles

Welome to my blog. This is where you'll find my thoughts on images, projects, equipment and all other things photographic.


Using white balance and flash gels for correction and effect

Modern digital cameras generally do a very good job of capturing the colours in a scene correctly. But... there are occasions when they are fooled into producing the wrong colours. When your light source is uncorrected artificial light (such as tungsten, halogen or fluorescent  bulbs), rather than the sun, you'll almost certainly end up with colour casts in your photos if you leave things to the camera. Fixing this is straightforward when all the light is from the same type of bulb, but can be trickier if you use different types of illumination together e.g. tungsten bulbs with flash light.

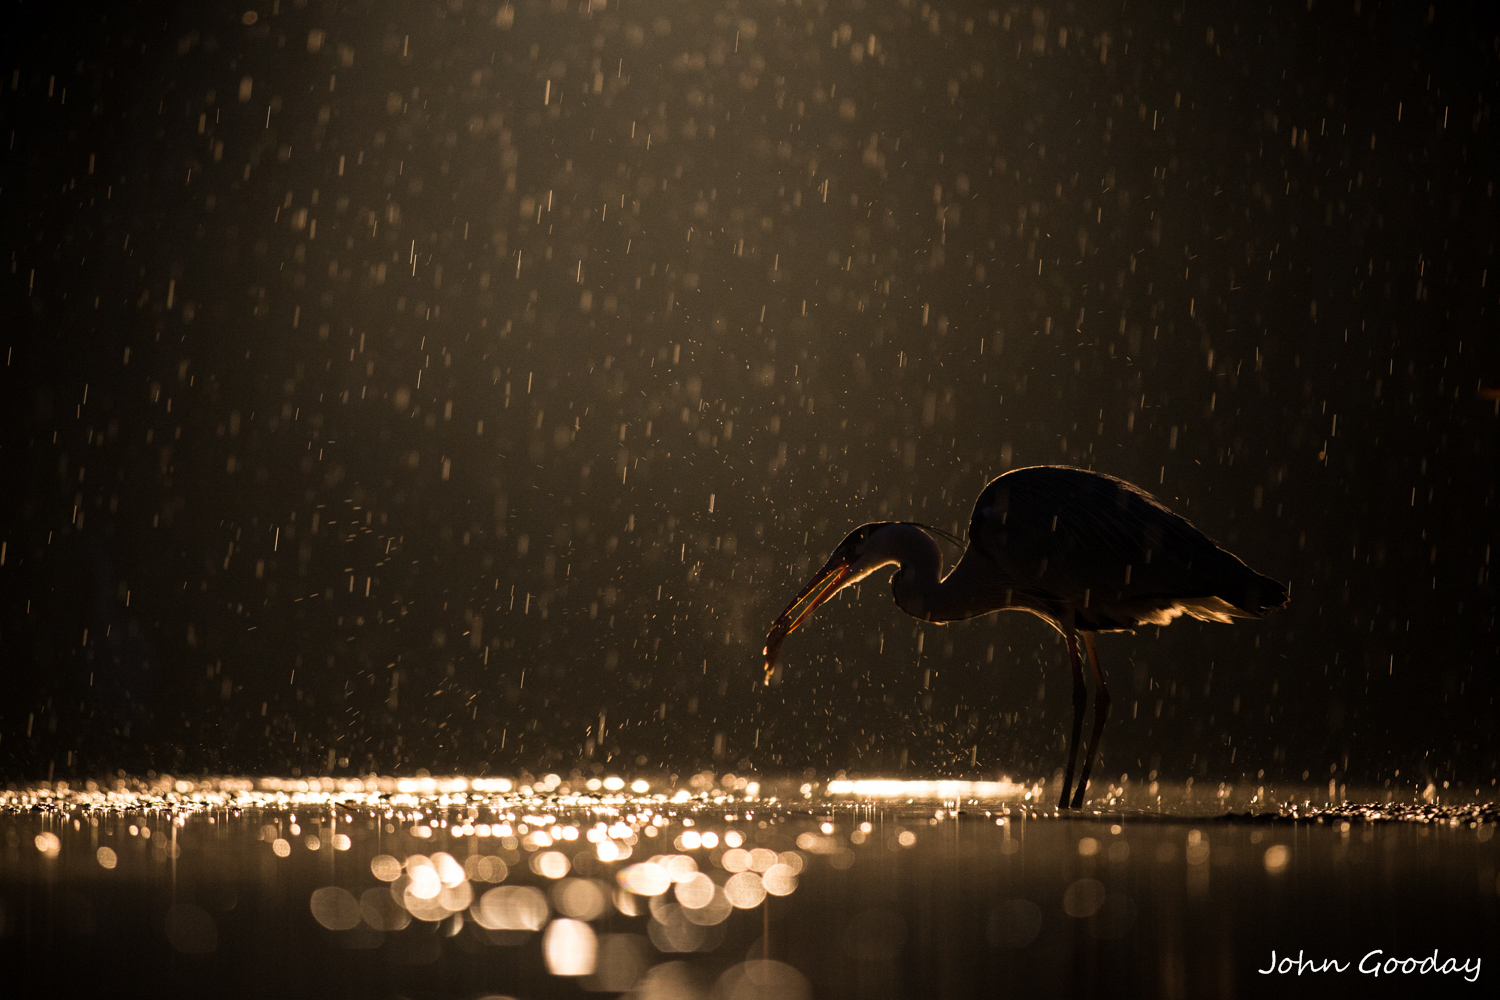
Let's first  have a look at a few examples of using white balance to fix straightforward colour casts... The first image was shot at night in the marshes of Kiskunsagi National Park, Hungary. A 2000W tungsten spotlight was placed behind and above the bird (thanks to Bence Mate for letting me use his light!). The spotlight gives a very orange light, which I haven't corrected in this photo - the camera was set to daylight white balance. In fact, I underexposed the image by a stop to get the silhouettes which also had the effect of saturating the oranges even more.  (Actually, I quite like the effect... but I'd be the first to admit that it's not exactly a natural look).


 (Image: Canon EOS 1DX, EF70-200mm f/2.8L IS II, 1/250 sec @ f/2.8. ISO 2000, tungsten backlight, tripod, hide) 


(Image: Canon EOS 1DX, EF70-200mm f/2.8L IS II, 1/250 sec @ f/2.8. ISO 2000, tungsten backlight, tripod, hide)


As all the light in this situation is the same colour temperature (it's all coming from the same tungsten spotlight after all), we can use white balance to 'correct' the image. It doesn't matter whether we set the white balance on the camera before taking the picture, or leave the camera white balance as is and change the temperature later in Lightroom (provided, of course, we're shooting raw format files rather than jpegs). The difference is immediately noticeable. In this shot taken  a few minutes later in which I set the camera white balance to 3050K (usually a setting of between 3000 and 3500 will correct tungsten light - the exact value depends on your particular light):

(Image: Canon EOS 5D Mark III, EF300mm f/2.8L IS II, 1/80th Sec @ f/4.5, ISO 1600, tungsten backlight, tripod, hide)

(Image: Canon EOS 5D Mark III, EF300mm f/2.8L IS II, 1/80th Sec @ f/4.5, ISO 1600, tungsten backlight, tripod, hide)


Of course, you can choose to set the white balance to a value somewhere between full correction and no correction to give varying levels of tint...

 (Image: Canon 1DX, EF70-200mm f/2.8L IS II, 1/200 sec@ f/2.8, ISO 2000, tungsten backlight, tripod, hide)


(Image: Canon 1DX, EF70-200mm f/2.8L IS II, 1/200 sec@ f/2.8, ISO 2000, tungsten backlight, tripod, hide)

As you can see, the photo has a more natural colour rather than the very strong orange cast of the first image,  but it retains some of the warm tone of the tungsten spotlight.  I set the white balance to 3500K to get this effect.


Adding flash to the mix...

Flashguns usually produce light that is roughly the same colour temperature  as midday daylight - around 5500 K. Unfortunately, the other light available in a scene might not be the same temperature. For example, late in the day, natural light becomes warmer (and more orange). If we use a flash to illuminate the foreground in a sunset scene, the lower colour temperature of the flash light will seem too cold (blue) and the resulting mixed light source image will usually look unnatural. To make things look right, we need to change the flash light to match the colour temperature of the evening sunlight. You'll have noticed that there are (sadly) no controls on your flash gun to set a different colour temperature. Instead, we have to place a coloured filter (usually called a gel - a hangover from times past when they were made from gelatine) onto the front of the flash to change it's colour temperature.

Back at the marsh, I wanted a bit more light to enable me to see more detail in the heron (remember: the tungsten light was behind the bird, so the side facing the camera was shaded). Using flash would give me more light but at a different temperature to the tungsten backlight. Fortunately, there are gels (filters) made specifically for the purpose of converting flash to match tungsten - CTO gels (CTO stands for Colour Temperature Orange). These come in various strengths, usually full, half and quarter are enough to allow you to match most tungsten lights.  I used two Canon EX580 speedlights either side of  my camera and placed full CTO gels in front of each in the image below. As the light from the flashes matched the tungsten spotlight, I was able to set white balance on camera to 3050 to correct the colour uniformly across the image. As the heron was some distance from the camera and I was using a 300mm telephoto lens I set the zoom heads on each flash to their maximum focal length to concentrate the light on the birds. (By the way, he large 'ghost heron' is actually a bird close to camera that was thrown out of focus as a result of using a large aperture - I was feeling arty when I took the shot).

 (Image: Canon EOS 1DX, EF300mm f/2.8L IS II, 1/25 sec @ f/3.2, ISO 2000, tungsten backlight, 2x EX580 II speedlights with CTO gel, tripod, hide)


(Image: Canon EOS 1DX, EF300mm f/2.8L IS II, 1/25 sec @ f/3.2, ISO 2000, tungsten backlight, 2x EX580 II speedlights with CTO gel, tripod, hide)

As before, it is possible to create other effects. I liked the herons in their natural colours but thought that it might be nice to keep a bit of the orange from the backlights in the rim light around the birds and the water. This time I used half CTO gel instead of full CTO gel on the flashes. This (in theory) should convert the  colour temperature of the flash to  around 3800k, compared to the spotlight temperature of 3050K. By setting the camera white balance to the same as the gelled flash ( 3800K, remember?) anything illuminated only by the flash (i.e. our side of the bird)  should be natural colour, while anything that the spotlight illuminates should be a bit orangish (how orange depends on the mix of flash and spotlight hitting the area in question). As you can see from the image below, this worked quite nicely in practice.

(Image: Canon EOS 1DX, EF300mm f/2.8L IS II, 1/125 sec @ f/3.2, ISO 2000, 2 x Canon EX580 II speedlights with 0.5 CTO gel, tungsten backlight, tripod, hide)

(Image: Canon EOS 1DX, EF300mm f/2.8L IS II, 1/125 sec @ f/3.2, ISO 2000, 2 x Canon EX580 II speedlights with 0.5 CTO gel, tungsten backlight, tripod, hide)

Flash gel sources

A number of companies offer complete kits consisting of different gels cut to fit speedlights and a means of attaching them to the flash (usually some kind of elasticated band). You can also buy sheets of gel and cut these to whatever size you need (sticky tape of elastic bands are the usual way of attaching these to the flash). Lee Filters make sheets of gel in a wide range of colours for correction and effects, Rosco also manufacture sheets. You can buy Lee sheets in a pack (the location basic kit gives you a useful selection) or in rolls. A warning: make sure that the flash gel never touches the front of the flash - if it does, it can partially melt onto the flash when you fire it, ruining your speedlight. You should attach gels ensuring that there is a gap between the gel and the flash head. The safest thing is to use a gel holder. You can make one yourself from some clear acrylic, or you can buy a ready made one (I found some for £5.99 at www.crazydaisyshop.com - they also stock Lee flash gels and complete kits from Rogue and Honl).

(Image: flash gel holder attached to a speedlight)

(Image: flash gel holder attached to a speedlight)


Fixing mixed shadow and light images using Lightroom or Adobe Camera Raw

Photographing a scene partly in shade and partly in sun is problematic for two reasons: the two sections of the picture have different amounts of light requiring different exposures; and they also have different colour temperatures that prevent the camera reproducing the scene in the way that we originally perceived it. In this article, I'll show you how I usually deal with these problems non-destructively using Lightroom's Develop module. Adobe Camera Raw (which ships with Photoshop CS and Photoshop Elements) shares the same underlying engine as Lightroom (the controls are just in different places), so you can use ACR to do this if you prefer.

Optimising the exposure differences between shadow and sunny areas

In mixed sun-shade images, exposure is often a problem. If you photograph to expose the shady area correctly (the fox in our example image) the sunny background will be overexposed. If you set your camera to expose for the sunny area, the fox will be too dark. When I photograph people in this situation, I solve the problem by setting the camera exposure for the bright areas and using a flash gun to fill in the 'missing' light in the dark areas. Unfortunately, wildlife doesn't usually hang around while you set-up a flash so another approach is needed. If you shoot your images in RAW format, then it's not too difficult to fix the problem using Lightroom or Adobe Camera Raw.

The original photo of the fox  is shown in the lower portion of the image above. I set the camera exposure for the sunny area as I didn't want to have any white over-exposed highlights in the nicely lit foliage in the background. It was late afternoon, so the difference in exposure between the light and shade areas wasn't too bad - around a stop.  I knew that I wouldn't have to brighten the dark areas too much in post processing. This is important as brightening areas of an image tends to make noise more noticeable and has a detrimental effect on contrast. If the difference is too great then the shade areas will be so dark that there won't be any detail to recover. If I'd had to shoot the same image in bright midday sun, the exposure difference between the background and the fox would have been several stops and this technique wouldn't have worked. You can see Lightroom's histogram for the original image below - as you can see, the right hand side of the graph is close to, but not touching, the axis - this shows that the exposure is as bright as possible without clipping highlights. If you enable the histogram display on your camera, you can check that you've got it right straight after taking the shot.

(Image: Histogram of photo as taken)

(Image: Histogram of photo as taken)


You can see from the camera settings along the bottom of the histogram that I had the shutter speed pretty low for a hand-held 700mm shot (I was balancing on a ladder at the time so 1/320th sec was the slowest I could manage without camera shake). I also had the aperture at its widest value. This was to ensure that I could keep the ISO as low as possible (remember, brightening dark areas makes noise more noticeable so the lower the ISO the better). 

The intermediate image below shows how I adjusted the exposure of the photo in Lightroom. The first job is to set the overall brightness of the image. Although the original exposure prevents any highlight clipping, some of the foliage in the sunny area is a little dark. Using the exposure slider in Lightroom brightens up the middle tones of an image while leaving the darkest and lightest areas almost untouched. So, I moved the Exposure slider to brighten the leaves to a level that I wanted - in this case a value of 0.6 stops. Next I used the Shadows slider to boost the dark areas of the picture. I stopped before getting the fox light enough in order to keep some darker areas in the background. Boosting shadows in this way can often remove true black from your image. This can be put back using the Blacks slider, as shown below. You may have to play about between the two sliders to get the best results. Finally, I set the white point by moving the Whites slider until I just got clipping. In this case, the original photo was pretty much dead on so I made only a tiny adjustment. 

The image is a lot better now, but the fox is still a bit dark and a second problem - colour temperature mismatch - is apparent.

(Image: exposure adjustments in Lightroom)

(Image: exposure adjustments in Lightroom)


Fixing colour temperature and fine-tuning the shadow exposure

In the intermediate image, the background is lit by late afternoon sun which has a warm orange-yellow feel. The shadow areas have a much cooler colour temperature which makes the fox and foreground look wrong. The human brain is very good at fixing colour temperature on the fly - if you were looking at the original scene, you wouldn't perceive this mismatch of lights as your brain will edit it automatically (this is also why you see objects as normal under artificial light at night, while a photograph of the same scene will often look very yellow as cameras don't have the white balance capabilities of the brain). So, our task is to get the colour temperatures of the shadow and light areas aligned so that the photograph looks closer to the original scene as we saw it.

First, we need to roughly select the parts of the picture that need adjusting. Lightroom's Radial Filter tool (the circle symbol below the histogram) can be used for this. If you click on it you'll find that you can draw a circle or oval, and that a set of sliders now appear in the side bar. You can drag the circle, stretch and  rotate it with the mouse so that it roughly covers the area you want to adjust (the fox and foreground foliage in this case). I usually zoom the image out to 1:16 and make a nice big oval (don't worry about the bits that don't fit onto the image - light room will ignore them). Once you've got the oval roughly where you want it, make sure that the Invert Mask box below the sliders is ticked (this tells Lightroom that you're going to make changes inside the oval, for some reason the default is everything but the circle...). You should also drag the Feather slider up - I generally set it to 50 to start - this ensures that the settings you mark are faded in rather than appearing as abrupt changes at the oval boundary.

You can now make your adjustments. To brighten the shadow area a little more, use the Exposure slider. I also put back in a little mid-tone contrast using the Clarity slider. Once the exposure is fine tuned you can fix the colour temperature using the Temp slider to get as close to the original scene as possible. You may also need to adjust the tint a little if the colours aren't quite right. 

The adjustment oval I made missed out the foxes ear. To fix this I simply added another oval (by clicking  New), adjusted it to roughly fit over the ear, and then set the sliders to the same values as the main oval.

Using Lightroom or ACR to do this has the advantage of not actually altering your original RAW file - the changes are recoded separately and only applied when you create a non-raw image for printing or viewing outside Lightroom.

Here's the final image again.