

Grey Heron during a night rain storm this January, Kiskunsag National Park, Hungary. Using a very slow shutter speed of 1/3 seconds accentuates the rain turning the drops into arcing lines. A backlight illuminates the rain behind the bird nicely.
Last week I visited my friend and co-conspirator, Tom Robinson, at his state-of-the-art hide photography operation in Lincolnshire (www.wildlifehides.co.uk). It’s been raining quite a lot over the last week and Tom told me that he’d had quite a few cancellations as a result. This amazed me as, like many professional wildlife photographers, I usually prefer the soft light of an overcast day to bright sunshine. (The main exception being birds in flight where more light gives a high shutter speed, and the colour of the sky itself is an important feature of the image). In this short blog, I’ll explain why I think rain is great for wildlife photography and how to prepare for, and photograph in wet weather.
What’s so good about rain?
Rain is one of the best times to photograph outdoors. On a rainy day you’ll get soft light all day, light that’s ideal for detailed images with balanced exposure. Unlike sunny weather, you can photograph anytime - no need to pack up as the middle of the day approaches as there are none of those over-bright highlights and blacker-than-black shadows that defeat the camera’s sensor range.
Images with rain in them are often very atmospheric compared to those shot on bright days. They are also a lot less common as most people don’t make the effort to venture out when the weather is inclement. This means your shots will be quite different to the usual wildlife photos. You can also convey different messages in your pictures, for example, highlighting wildlife’s struggle against the elements.
Rain gives vegetation a subtle saturated, greener look. Colours are pastel rather than garishly bright which gives images a new feel. Rain drops themselves can look striking on feathers and fur.
Which camera techniques work best?
Photographing in rain doesn’t require any special techniques, but there are a few things you can do to improve shots.
Rain is easiest to see in a photo when it’s against a background that’s in shadow. Photographing against light grey rain clouds will usually result in the drops being almost invisible in the shot.
Backlight (where there is a light source behind the subject shining back towards the camera) tends to emphasise the rain (especially against darker backgrounds or at night). A remote controlled flash can be a handy backlight, just make sure that the flash itself is not visible in shot and that it is focused so that it’s light doesn’t fall directly on the camera lens. You can do this by having the subject in front of the flash, so that it’s blocking direct light to the camera, or by placing it high up or low down out of shot. You may need to use a snoot or grid attachment control the spread of light and avoid lens flare. I often use a Magbeam Fresnel lens on backlight flashes.
If the rain is very heavy, it will reduce the contrast of your image and perhaps even blur the subject slightly. How strong this effect is will depend on the distance between the camera and subject. The further away the subject is from the camera, the more rain will be between you and your target. In these circumstances try to get closer to the subject and use a shorter focal length lens than normal if necessary.
You can use shutter speed to control the appearance of the rain - from long streaks at low shutter speed to well-defined drops at faster settings. For capturing pronounced rain streaks with a 500mm lens, try shooting below 1/250th. The image at the top of this article was shot at 1/3rd second on a sturdy tripod to give very exaggerated rain trails This only works with motionless subjects (such as Herons that tend to freeze in place while waiting for prey to move to striking distance). . The Grey Heron portrait in Image 2 used a setting of 1/160th, while the young Kestrel (Image 1) and Puffin (Image 3) employed shutter speeds of 1/800 and 1/1000 respectively. You can see how these setting change the look of the rain. You’ll need to adjust these shutter setting for the length of lens that you are using. Broadly speaking, if you divide the effective focal length (35mm equivalent) of the lens by two, that will give you something close to the fastest shutter speed for good rain streaks. For example, with a 200mm lens on a 1.5x crop sensor camera such as a Nikon D500, to get nice rain streaks you’ll need a shutter speed of:
( 200 x 1.5 ) / 2 = 1/150th second and below.
Rain + night + backlight = magical images
As I mentioned above, using a backlight to light rain against a dark background really makes it stand out. The very best effects are achieved at night when the raindrops really glow. For a silhouette of the subject you just need a backlight. If you use a flash as a backlight (the easiest method) you will be able to capture round rain drops, but not rain streaks. This is because the flash pulse itself is short (normally 1/300 - 1/10,000 second depending on the flash power dialled in and the flash itself). As there’s no other light source, the image is formed on the sensor only when the flash is firing. Even if you have a shutter speed of, say, 1 second, only the fraction of time that the flash is firing for will create the image.
If you want to see the subject detail, rather than shooting a silhouette, then add front lights. Make sure that your background it distant or these will illuminate it as well as the target. Image 04 uses flashes to both back and front light the Grey Heron. The short duration of the flash pulse freezes the rain drops.
To create rain streaks at night, your backlight must be a continuous light source such as a halogen floodlight, video light, LED light strip etc. It will need to be bright enough to let you set the shutter speed to your desired setting. I usually find a 1000W halogen spotlight 10m back from the subject works. You’ll need to use a light that is designed for outdoor use and is fully insulated and weather sealed to avoid electrocution!
But I don’t like getting wet!
Well, who does? Fortunately, there are ways to avoid this.
Check a detailed, hourly weather forecast (in the UK, try https://www.metoffice.gov.uk/) before you shoot and see if it’s possible to get to your photo location before the rain starts and leave after it finishes.
Dress to keep out waterr: waterproof boots/wellingtons, waterproof trousers and coat, plus a hat. If it’s cold, make sure your gloves are waterproof (I like winter rock climbing gloves from Roekle as these are warm, waterproof and give you a bit of feel to operate camera buttons).
Use a (waterproof!) hide. Most permanent wildlife photography hides for hire, such as www.wildlifehides.co.uk, will be fully waterproof. Pop-up hides made from man-made plastics will keep you dry - I particularly like the Ameristep Doghouse hide, but there are many alternatives - just make sure you stick sealing tape over any punctures that you may get from wear and tear in the field. Plumbers PTFE sealing tape, available from DIY stores, is handy for this. If you plan to lie on the ground, plastic sheeting is useful, or even a large garden rubbish sack that you can partly lie inside. (I know someone who uses body bags to keep themselves dry when lying down, but this might be a bit extreme/unnerving for most people. If not, you can buy them here for around £15 - go for the heavy duty dark coloured models https://www.barbermedical.com/body-bags ).
Won’t rain damage my camera equipment?
Well, yes, if you allow your camera to get wet enough. Most upper end cameras and lenses have pretty good weather sealing these days (make sure all the rubber connection covers on the side of the camera are firmly in place) and will stand a little rain, but it’s best to o dress your camera for the weather in a waterproof cover - https://www.wildlifewatchingsupplies.co.uk have a good range in various sizes and camouflage patterns. Optech produce easy to store see through rain covers in different sizes - a pack of two covers retails between £8 and £12 on Amazon. Failing that, a clear plastic bin liner with a hole for the lens cut in it is a good makeshift solution. Use strong elastic bands, or bungee cords to seal the bag around your lens hood. For flashes, I use large, clear ziplock bags and fire the flash from inside the bag.
Keep your camera in a waterproof camera bag for the journey to and from your location - many commonly available camera bags are not actually waterproof, just water repellent so check yours before venturing into a downpour.
Take a few dry, absorbent cloths to remove any water that does get onto equipment, and lens cloths/cleaning fluid for dealing with raindrops on the lens - if you use a lens hood this shouldn’t be a problem unless you’re shooting into a headwind.
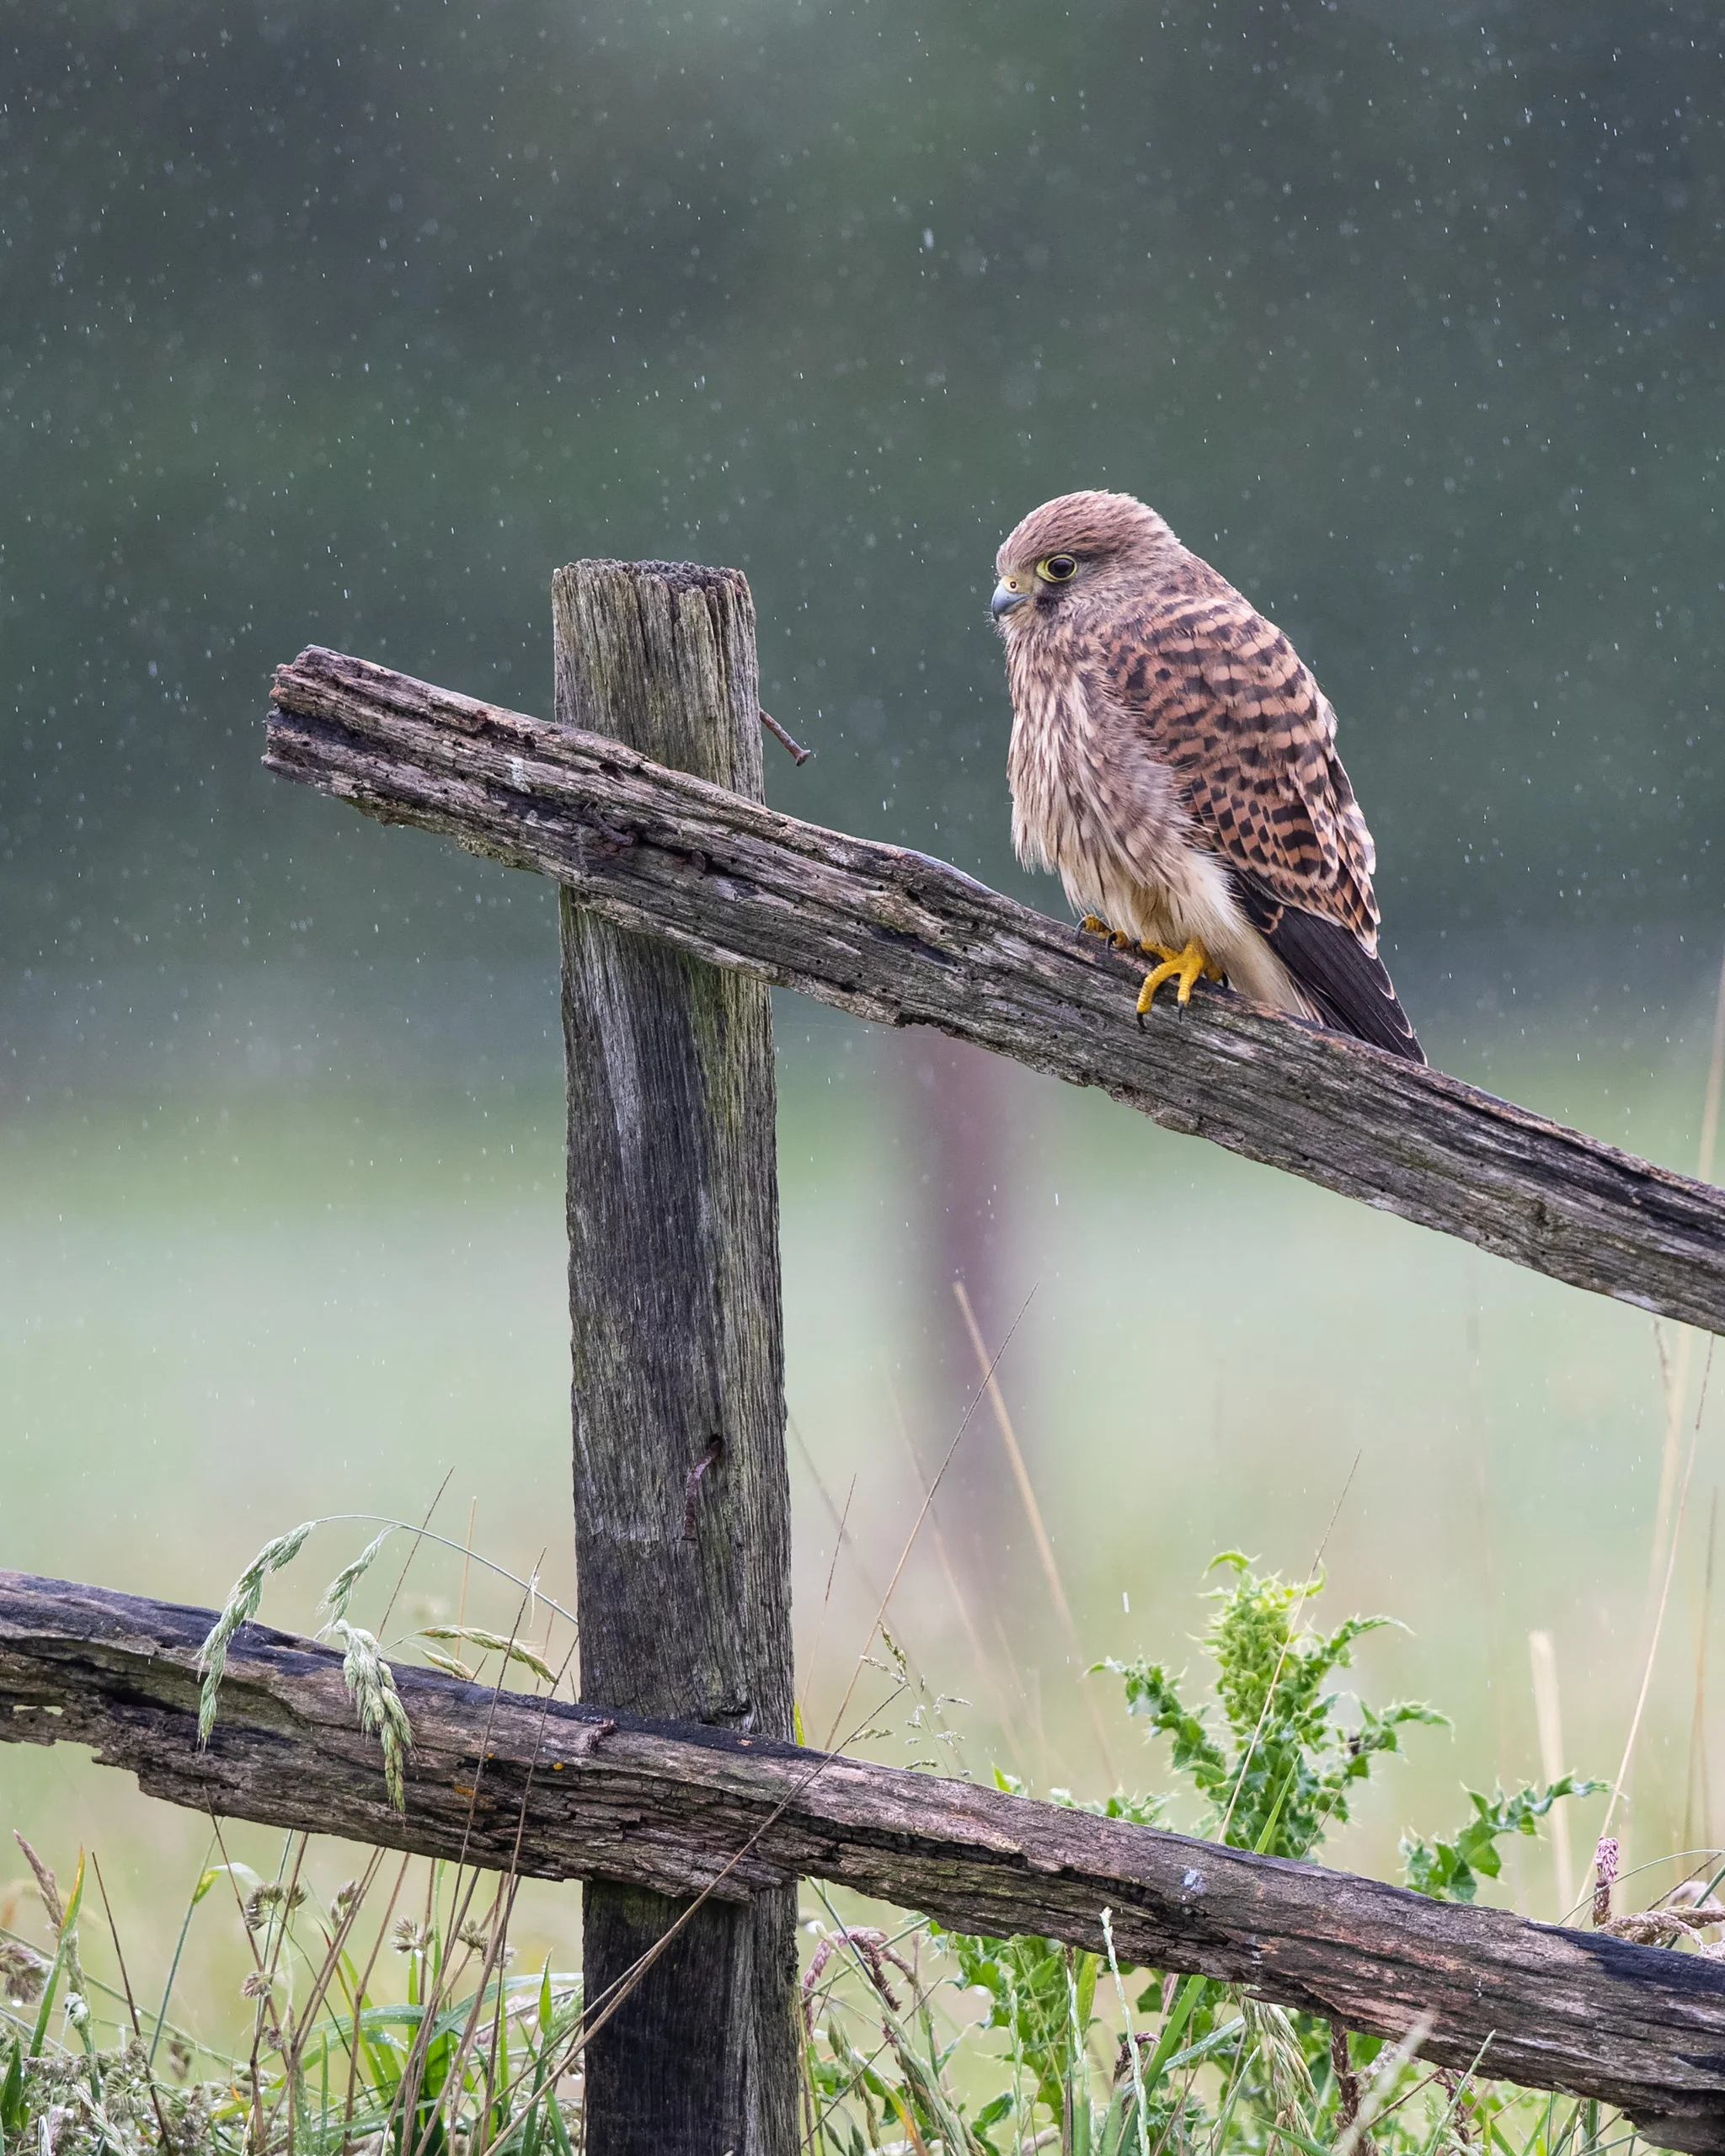
Image 01: Young Kestrel waiting for an adult to bring some food in last week’s English summer rain. At higher shutters speeds (1/640 was used here) the rain can be frozen in the image to look more like drops. This was shot at Wildlife Photography Hides’ ‘Wired Hide’.

Image 02: Grey Heron during a downpour at Wildlife Photography Hides’ Pond Hide

Image 03: Raindrops resting on the oily feathers of an Atlantic Puffin, Skomer Island, Wales

Image 04: Heron at night backlit with two speedlights, left and right high out of shot, and two front flashes to light the front of the bird. If you prefer a silhouette then you don’t need the front flashes. Also taken at Wildlife Photography Hides’ Pond Hide.

Image 05: Great Egret at night backlit with a 1000W spotlight to give continuous light. This allows us to capture rain streaks using a slow shutter speed (1/80 sec) which wouldn’t be possible if we’d used a flash instead.