

Golden flight
Backlighting can make flight shots more dramatic - especially if the bird has a dark background behind it. When setting the exposure (I usually shoot in manual mode for flight shots) the aim is to get a setting that just allows a little clipping in the backlit white feathers (see the Puffin's shoulders) but nowhere else. Use your camera's highlight warning function (the setting that makes blown highlights flash red when you review the image on the back of the camera) to tweak the exposure settings during test shots. A dark background such as a hill or rock in shadow, with the sun behind and above, will emphasise nice light through the feathers. Where you take the picture depends on where this nice light occurs - I had to change to a 500mm lens as 300mm was a little short to catch the backlight which occurred when the Puffin was a bit far out. You'll need to position yourself so that the backlight hits close to landing points if you want to catch the outstretched wings just before landing. As the light moves, you'll have to move your camera and shoot different areas. The aperture you select will determine how much of the Puffin is in focus - with the 500mm on a full frame body I found f/5.6 to f/8 gave me a good area of focus from the head to the feet (f/4 left the feet blurred). With a shorter lens, obviously a larger aperture would be needed. These images work best at the end of the day when the light is relatively subdued in brightness. Unfortunately, you'll find that the exposure to keep the wings correctly lit will result in the rest of the Puffin being underexposed. There little than can be done about this (well, actually I have a rather elaborate and cunning plan for next time which I'll document if it works) save boosting the lower mid-tones in post processing. For this reason, a camera that performs well at high ISO is a real benefit as amplifying the dark areas of the bird will also increase the visibility of any digital noise in these areas.
Canon EOS 1DX, EF500mm f/4L IS II, 1/2000 sec, f/5.6. ISO 1600

Radient
Common Starling lit by polarised and green tinted light reflected from the surface of a pool.
When light is reflected fromflat surface it is polarised in a single direction - this can often make the colours in birds wings really stand out. You can see all this light at work in the image of the Starling here - the bird seems to radiate colour where we normally see muted tones that appear more grey. There is a large pool in front of the Starling, just out of shot. The sunlight from behind-left bounces off of this and brings out the breeding season colours pf the oils in the feathers.
Canon EOS 1DX, EF500mm f/4L IS II, 1/100th sec, f/5, ISO 1600, tripod, hide

Night Fighters
Two Grey Herons fighting at night on a partially frozen lake.
This is a shot that I've been planning for a while (and it took a few goes to get it right). The Herons are strongly lit from behind with a constant bright light, leaving the side facing the camera dark. Flash is used to light the dark side, freezing the facial expression and details on the birds with its relatively short duration. Meanwhile, setting a lowish shutter speed means that those parts mainly lit by the back light are slightly blurred to (hopefully) convey a sense of motion. Here is the recipe...
You will need:
- 2 quite angry birds
- 500kg of fish (I spent most of a week trying to get this shot - herons eat a lot of fish)
- 1 x 1000W tungsten spotlight mounted behind and above the birds, out of shot
- 2 x Profoto B2 flashes (or similar short pulse flash guns), one set about 1 stop lower than the other to create depth in the lighting
- A camera that's good at high ISO (I used a Canon 5D Mark III)
- A medium aperture lens with as wide an aperture as possible (I used a -Canon 70-200mm f/2.8 L IS II at 190mm)
- A fair amount of patience
Cooking instructions:
1/100th sec, f/2.8, ISO 2000
Canon EOS 5D Mk III, EF70-200mm f/2.8L IS II, 1/100th sec, f/2.8, ISO 2000, 2 x Profoto B2 flashes, 1 x 1000W tungsten spotlight, tripod, hide
.

Feeding time
Working with wild animals, one thing that you soon learn is that they won't quite do what you want them to. A family of Hoopoes that I've photographed for the last couple of years in Koros-Maros National Park, Hungary were no exception to this. Eschewing various scenic nesting sites, they had decided to make their home in a secure but decidedly unattractive metal oil drum on a disused airfield for several years.
This year I decided to improve the oil drum location before the birds returned from overwintering in Africa. The nearby forests have plenty of fallen trees with peeling bark, so with Zoltan Pabar, my friend and owner of the excellent Hungarobirds bird tours and guiding service. The bark was then screwed onto a wooden frame in which there was a gap for the nest hole. This fake tree should be put in place early in the season, before the birds have nested - Hoopoes had been nesting in the oil drum for several seasons so it was likely that they'd use it again this year, which proved to be the case. There are half a dozen oil drums on the airfield - we left all but one untouched (there are normally Hoopoe nests in several drums every summer) just in case they didn't like the alterations.
In fact, the Hoopoes seemed quite happy with their oil drum make-over. In this shot the young Hoopoe is inside the drum and is poking its head through the entrance hole in the fake tree.
Canon EOS 1-DX, EF500mm f/4L IS II + 2x Mk III, 1/1250th sec, f/10, ISO 2500, tripod, hide

Droplets
Close-up of a mute swan.
I'm lucky enough to travel to all sorts of overseas destinations for my work, but this image was shot at a small lake less than a mile from my home. When taking pictures of a very commonly photographed subject, it can be a bit of a challenge to come up with something eye catching. One technique that can liven up an image is to to focus on a small area showing detail that isn't normally noticed. When doing this with wild animals, a long telephoto lens keeps you out of pecking range.
Canon EOS 7D, EF100-400mm f/4.5-5.6L IS, 1/400n sec at f/6.3, ISO 250
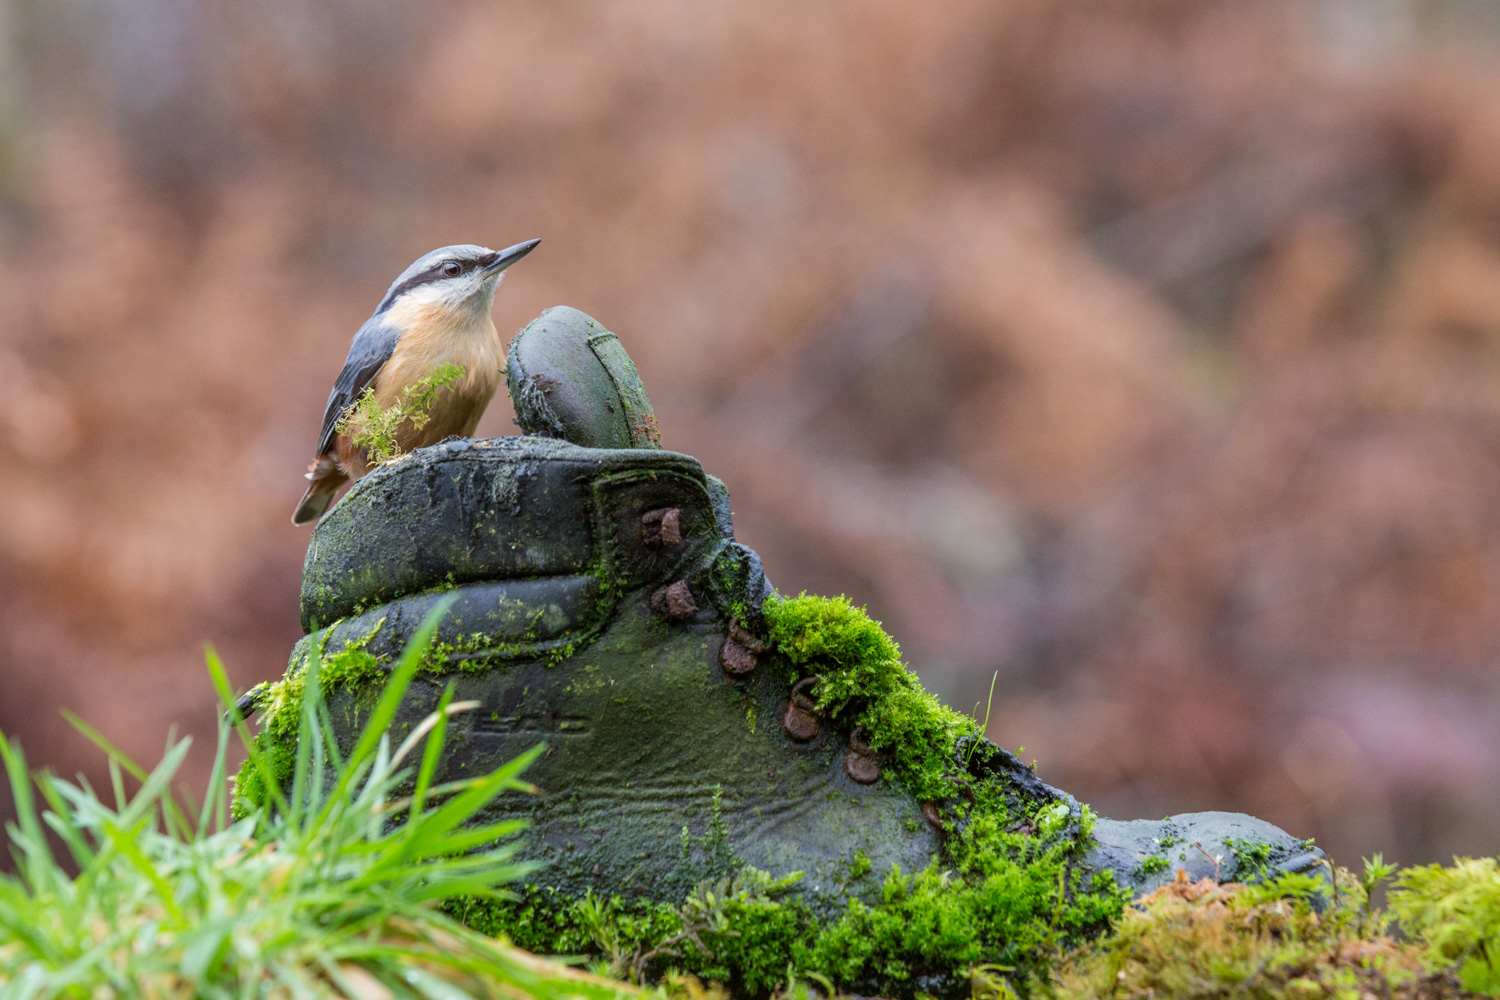
Shoo-shoe!
A Nuthatch on top of an old, weathered boot. The shoe was filled with seed to attract the bird and placed on a raised table with a sprinkiling of earth into which grass was planted.
The image was photographed using a relatively small aperture to ensure that the shoe and bird were all sharp. In order to get a pleasing background when focusing at f/8, the lens was used at it's minimum focus distance and the background (woodland foliage) was as far behind the bird as possible.
Canon EOS 5D Mark III, EF100-400mm f/4.5-5.6L, 1/160 sec @ f/8, ISO 1600, tripod, hide
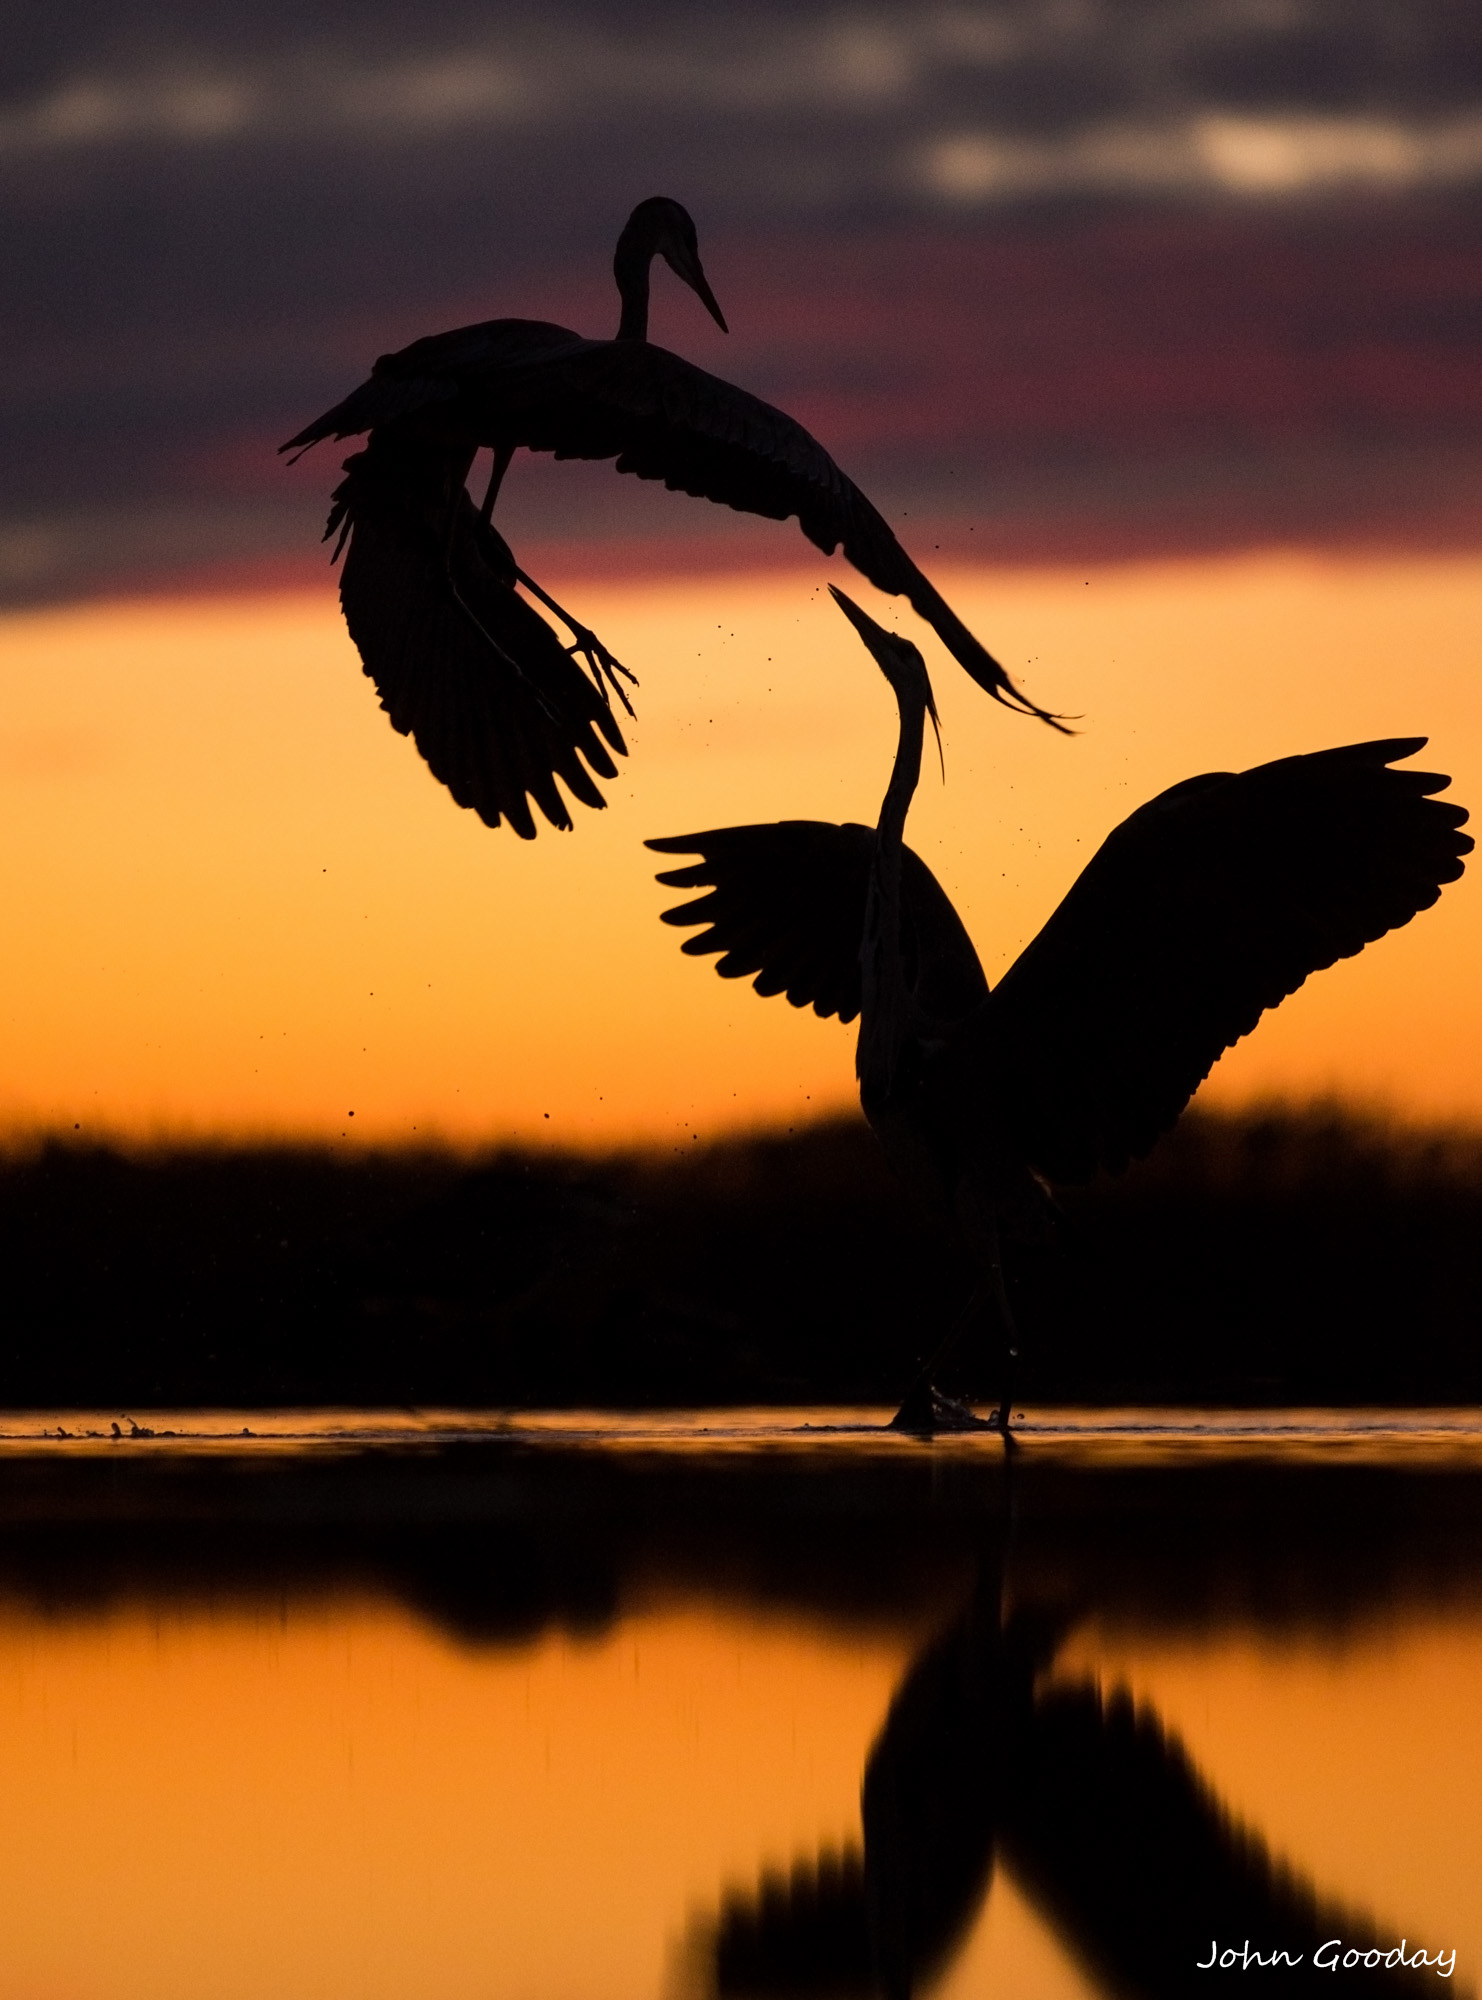
Evening encounter
Two Grey Herons fighting at sunset.
Silhouettes need to be pin sharp - there's no detail in the subject, so the viewer's eye is drawn to the outline and soon spots any softness there. Shooting at dusk makes life a little more interesting by giving a saturated canvas to work on. Underexposing the image by 1 - 2 stops really emphasises the oranges and yellows. Setting white balance to 'cloudy' will add further saturation of the oranges, yellows and reds (and because the birds are silhouettes, there's no issue about them taking on an unnatural hue). Wide aperture and high ISO are required in low light conditions like these to allow a high shutter speed. Fortunately, herons are relatively slow birds in flight so 1/1600 sec was fast enough to capture a sharp image.
Canon EOS 5D Mark III, EF70-200mm f/2.8L IS II, 1/1600 sec @ f/2.8, ISO 3200, tripod, hide
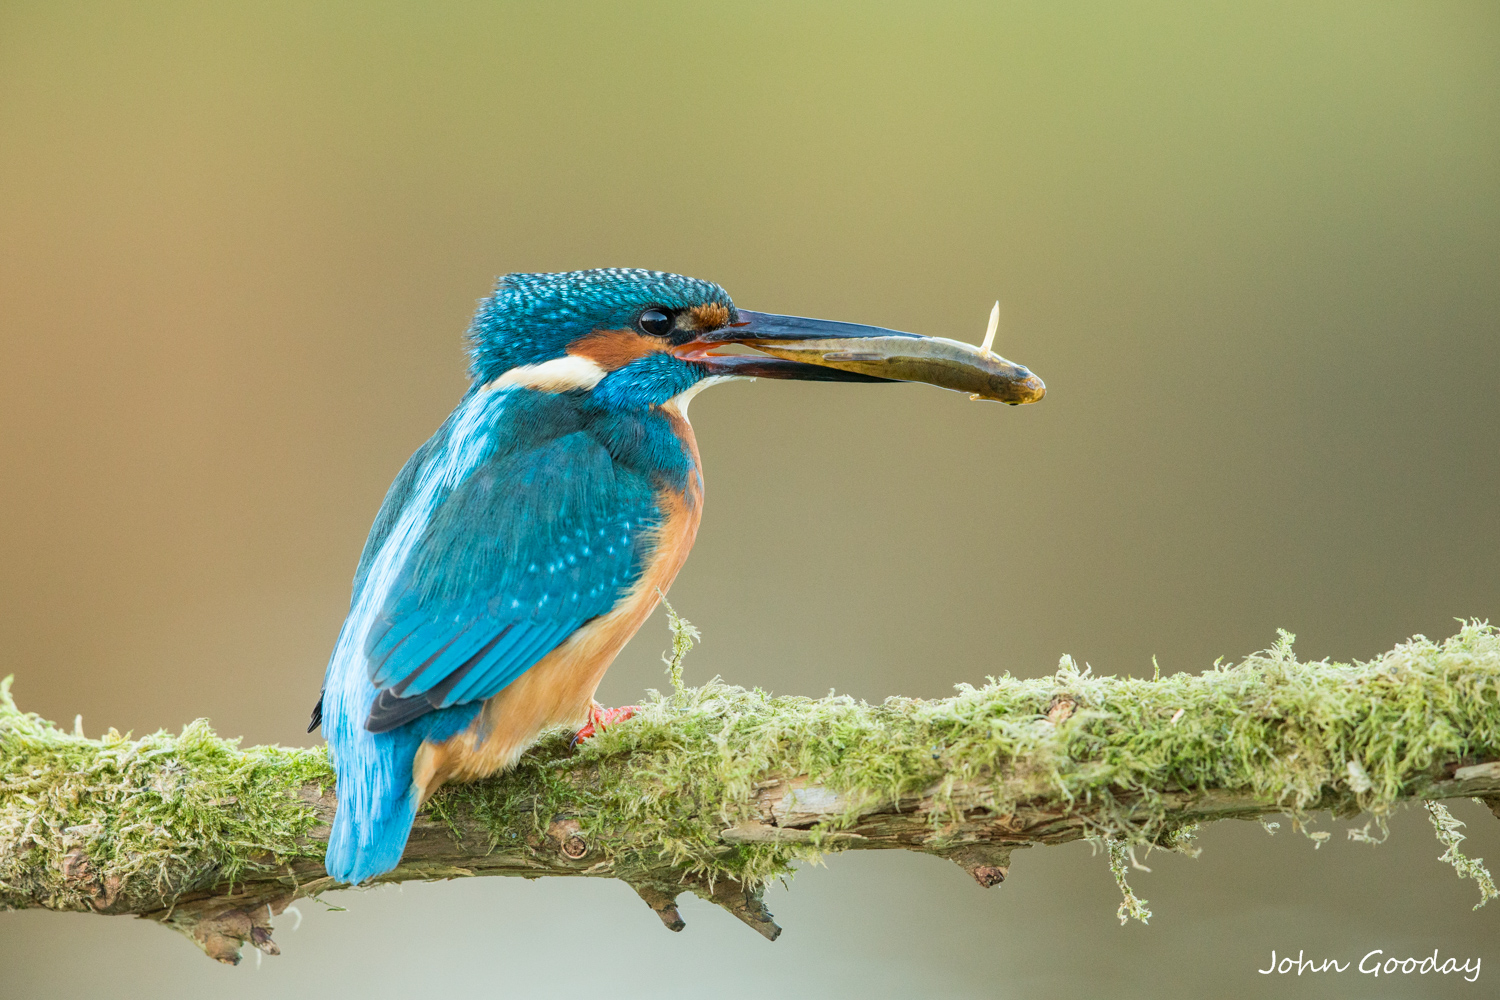
High and dry
A Kingfisher grapples with a catch on a mossy branch.
Getting close to a Kingfisher can be problematic as they can be quite shy. Using a long lens is usually the order of the day - the longer the better. My longest lens is 500mm, so increasing the focal length with matched extenders is a good way to go. Not all lenses accept extenders - generally only the higher quality 'professional level' telephotos. Usually, prime (fixed focal length) lenses give better results than zoom lenses. In the last couple of years, Canon has significantly improved the performance of its lenses when coupled with extenders. The latest mark II 200 f/2, 300/ f/2.8, 400 f/2.8, 500 f/4 and 600 /f4 telephotos have virtually no image quality loss when paired with the newest Mark III extenders (the improvement over earlier models is impressive).
Using an extender reduces the amount of light reaching the camera sensor - 1 stop for a 1.4 x Extender, 2 stops for a 2x. Fortunately the latest generation of camera bodies have ever better than ever high ISO performance so this is no longer the problem it once was.
Canon EOS 1DX, EF500mm f/4L IS II + 1.4x III, 1/320 sec @ f/6.3, ISO 2500, tripod, hide
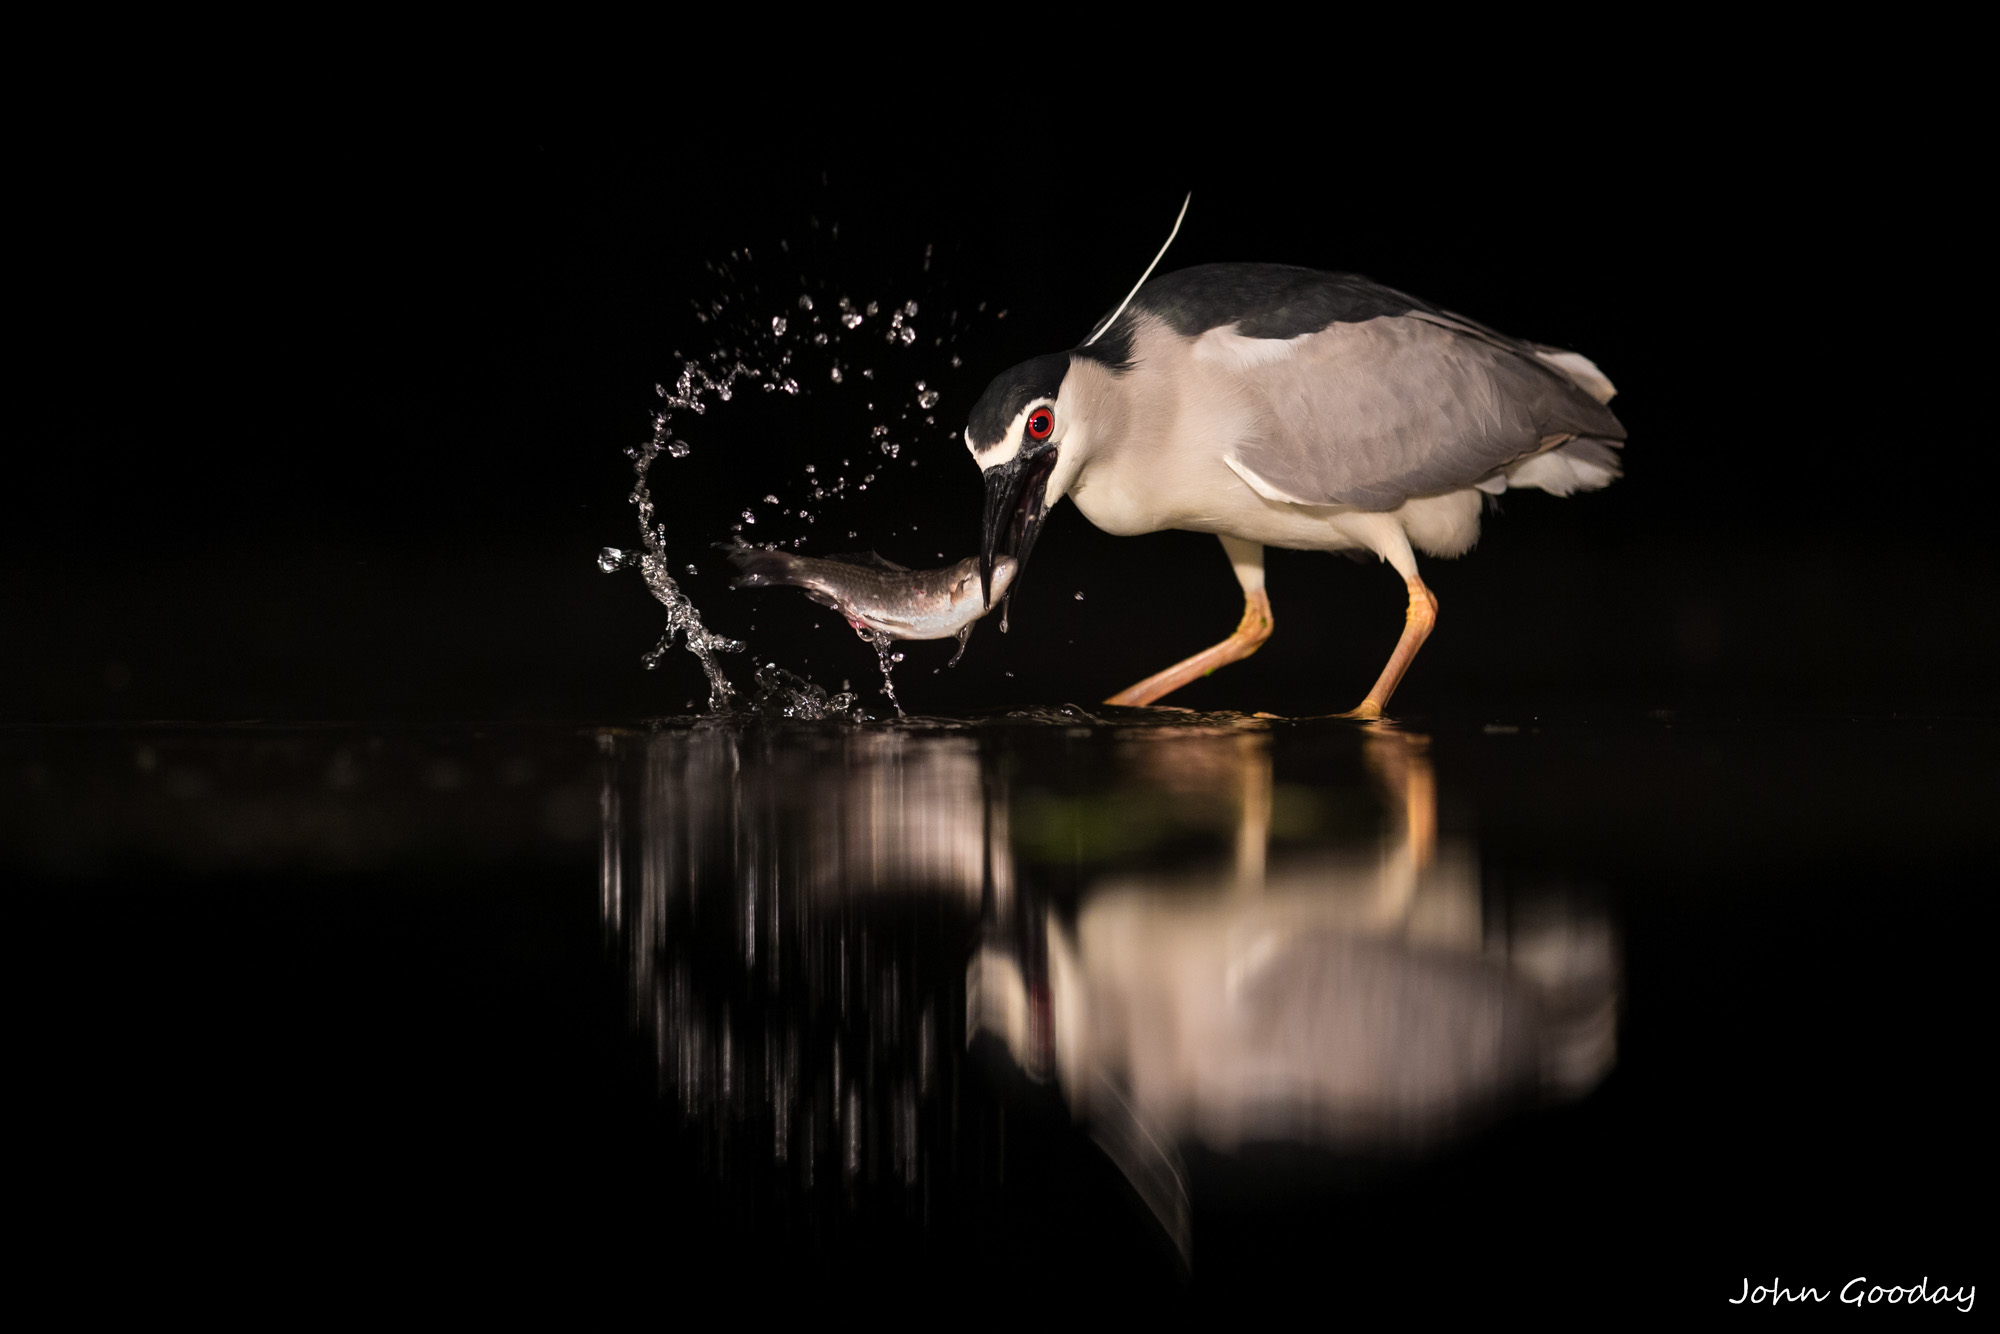
Extreme fishing #1
In the early hours of the morning, Kiskunsagi National Park in Hungary is full of activity. Here, a Black-crowned Night Heron catches a fish in one of the many marshland pools.
One of the biggest problems of shooting at night is that there's just not enough light to see your subject well enough to focus, let alone capture an image. Flash can provide enough light to take a picture, but doesn't solve the it's-too-dark-to-focus problem. In this shot continuous lighting was used as an alternative to flash. Halogen floodlights were placed on top of the hide to illuminate the area that the birds used for fishing. High ISO and a wide-aperture lens allowed a shutter speed high eneough to freeze the action (but only just!) and using a state-of-the-art full-frame camera kept image noise within acceptable limits. The camera white balance was set manually to compensate for the colour cast from the lights.
Canon EOS 1DX, EF70-200mm f/2.8L IS II, 1/500 sec @ f/2.8, ISO 1600, tripod, hide, 2 x 1000W halogen floodlights

A sideways look at life
A Little Owl peers out from a hollow.
This image was shot at a workshop in Gloucester, England. With captive birds, it's very easy to shoot frame filling head-on close-ups. Sometimes changing perspective is all that's needed to get a more interesting shot. Using a super-telephoto lens at maximum aperture allows selective focus on the bird while nicely softening the background and bark of the tree.
Canon EOS 1DX, EF500mm f/4L IS II, 1/800 sec @ f/4, ISO 800, tripod

Bending low
A Grey Heron explores the shallow waters at the edge of a pool.
I liked the shape that the heron's head and neck made as it searched the water, so I shot a close-up that removed other elements from the image. It also had the advantage of cropping out the drab grey February sky. A wide aperture blurred the golden reedbed in the background while the low shooting position helps the viewer connect with the bird's world. I shot this with my back-up camera as it had the right length lens attached at the time. With a crop-sensor model like the Canon 7D, high-ISO image noise is much more apparent than on full-frame sensor cameras so I kept the ISO low.
Canon EOS 7D, EF300mm f/2.8L IS, 1/1000 sec @ f/3.2, ISO 500, tripod, hide

Waiting for the night
A Common Buzzard silhouetted at sunset (confusingly for American readers, a Buzzard is actually a type of hawk over here in Europe).
The image was deliberately underexposed to increase colour saturation and the white balance on the camera set manually in order to get the blues to stand out more.
Canon EOS 5D Mark III, EF70-200mm f/2.8L IS II, 1/80 sec @ f/4, ISO 500, tripod

Daylight fish robbery
A Great Egret steals a fish caught by a Grey Heron.
I specifically set out to get images of fighting water birds. From previous visits to Kiskunsagi National Park, hungary in winter, I'd seen that the birds frequently battled over the well-stocked marsh lake. These arguments erupt and end suddenly, and with 30 or more birds in the immediate vicinity of the hide it can be a little daunting to try and work out which might fight (and so which to follow in the viewfinder... and when).
For me, the best preparation for this sort of shot is to photograph in the same place for several days. On this occasion, I found it helped to avoid photographing fighting at first, taking time to just watch what was happening instead (you can miss a lot if you spend all your time glued to the camera eyepiece!). After doing this for a while (taking a few portrait shots in the meantime - it's hard to resist photographing when there are subjects just in front of you), I started to get a feel for how the birds behaved just prior to a fight breaking out, and the likely spots for fighting (some parts of the water attracted a higher density of birds which resulted in more fighting as they clambered for position. I started photographing the action towards the end of the second day and continued for 5 days in total.
When I found a pair of birds that I thought might be about to fight, I locked an initial focus point onto them, then released the AF and waited. When they started to fight I activated the AF again and, when (or should that be 'if', as it's not always easy...) I got a lock, shot, following the birds and keeping them in the centre of the frame as best I could. I used a rigid tripod with a Uniqball head set to tilt/pan only.
Canon EOS 1-DX, EF70-200mm f/2.8L IS II, 1/1250th sec, f/3.2, ISO 640, tripod, hide

Raindrops keep falling on my head
A Common Starling on a damp English spring day.
Starlings are much more colourful than people think. They're always on the move and this somehow makes the colours on their coat merge into a uniform dark grey. But if you freeze them with a camera, the blues, and purples stand out - especially if there is a reflective light source underneath them. In this shot, light reflecting from a pond just below the log adds the magic (a blanket of snow works even better). I'll let you into a trade secret... the raindrops are actually spray thrown up by other starlings washing in the pond just out of shot. A reasonably high shutter speed (1/250 - 1/400) retains the roundness in the drops - with a slower shutter you'll just get long streaks, while a faster setting will remove the slight blur that contributes to the feeling of motion.
Canon EOS 5D Mark III, EF500mm f/4L IS II, 1/320 sec @ f/4.5, ISO 1250, tripod, hide

Balancing act
A male Reed Bunting clings onto a reed stem.
Sometimes it's worth taking the extra effort to get down low for a shot. I spend a disproportionate amount of my life crawling around on my stomach at the edge of pools, lakes and streams. Getting down to the subject's level connects the viewer to the animal. You're also a lot less likely to show up in any reflections if you're nice and low down.
Canon EOS 5D Mark III, EF500mm f/4L IS II + 1.4x II, 1/400 sec @ f/6.3, ISO 1250, tripod

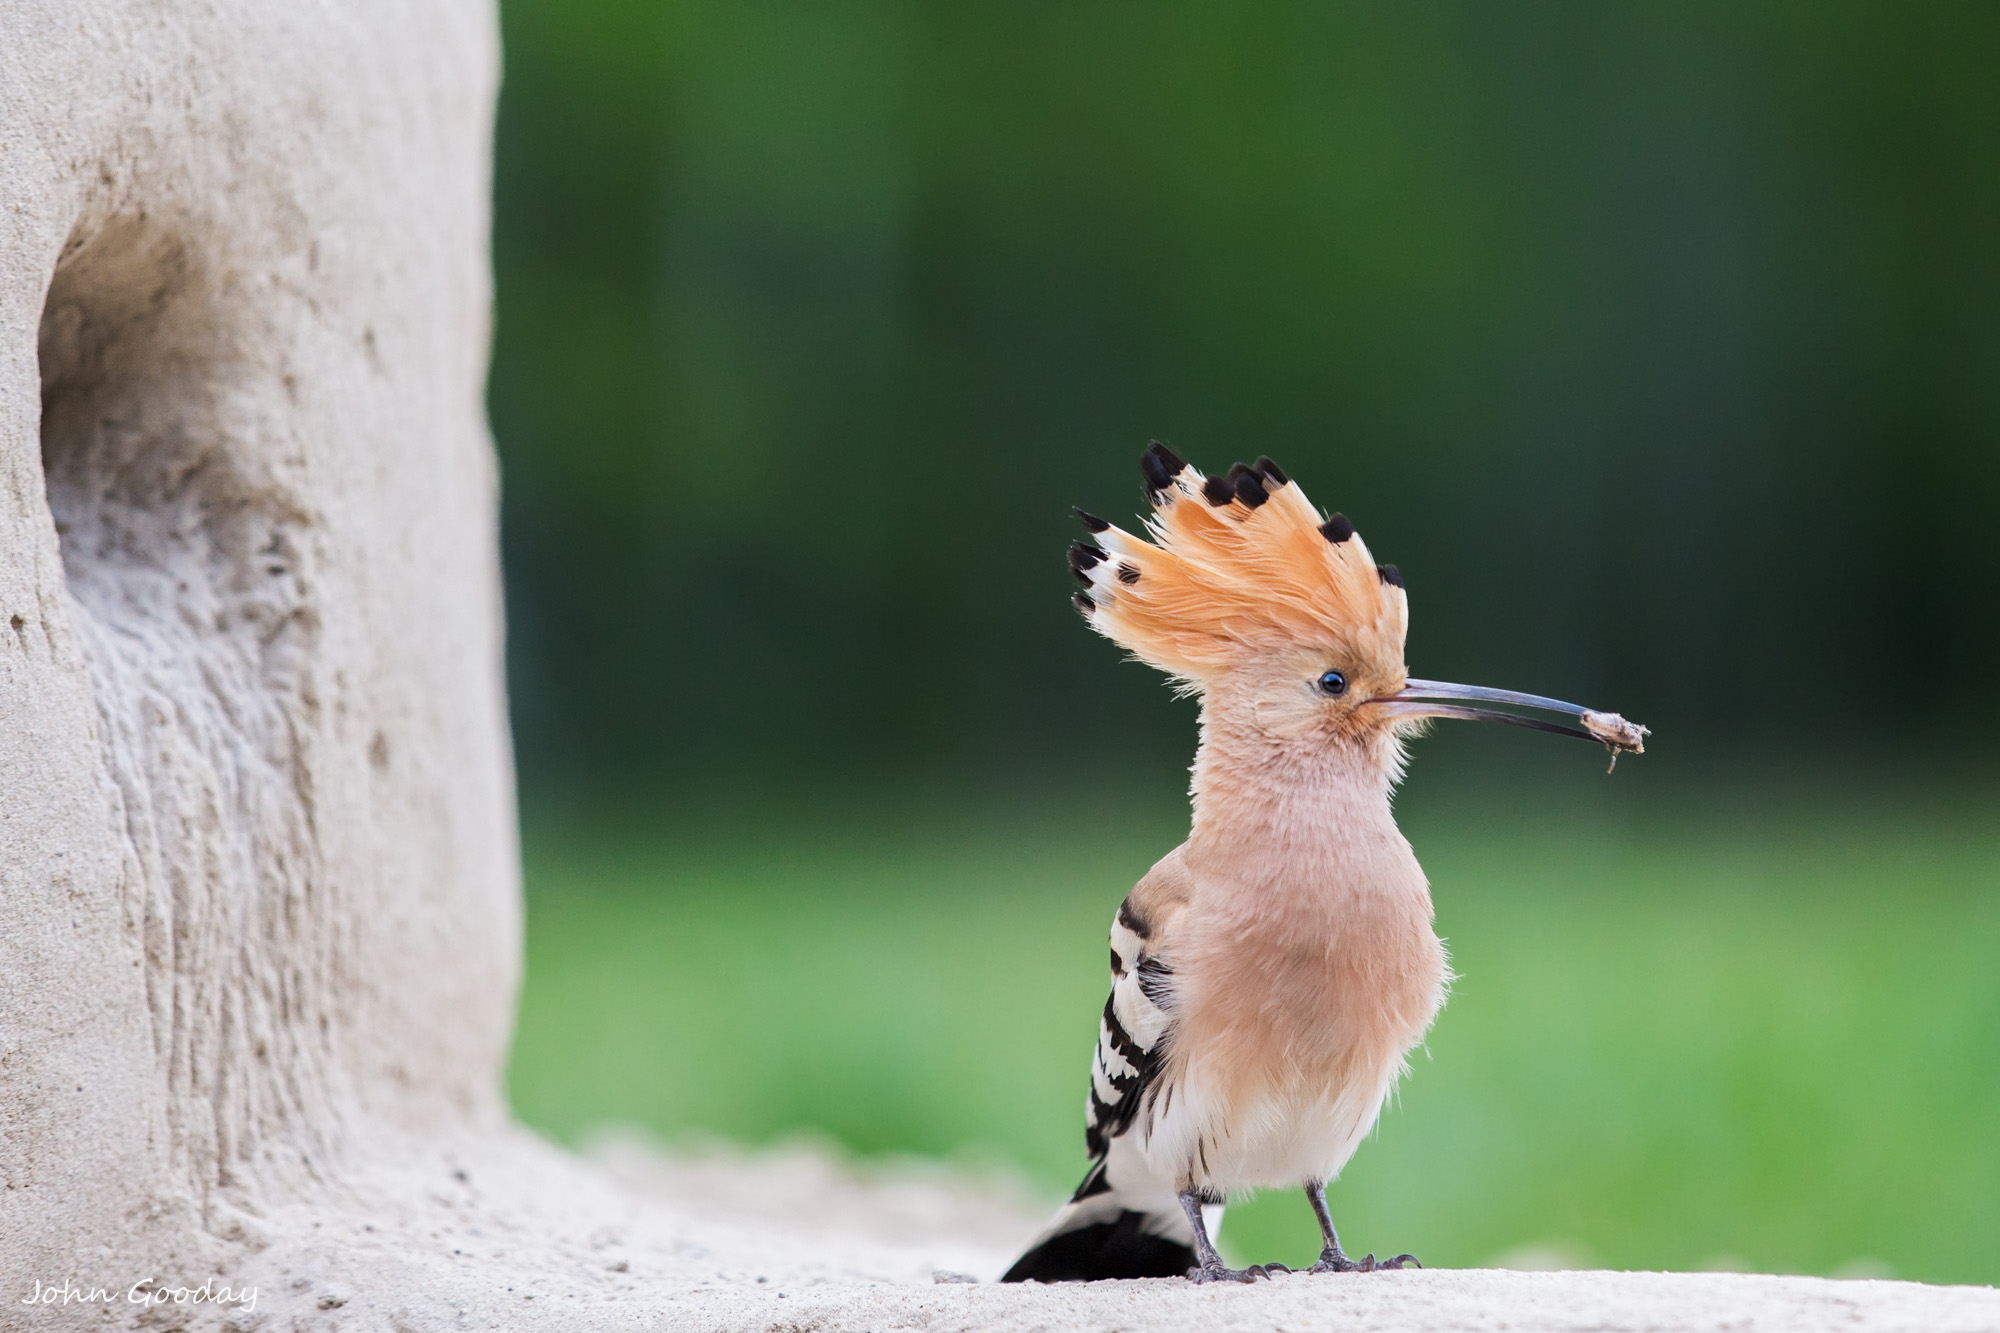
Lizard for lunch
A Eurasian Hoopoe with a freshly caught lizard.
The Hoopoe was bringing food back to its nest (a rather unphotogenic concrete drum just below shot) every 15 minutes or so. It completely ignored the pop-up hide that I was hidden in a few meters away, which made my job pretty straightforward. Hoopoes are mid-sized birds, so to keep the beak, body and head crest all in focus the lens aperture was stopped down to f/5.6. On a dull Hungarian early morning, this meant using a higher ISO than I'd have liked so that the shutter speed could be kept high enough to avoid motion blur. Fortunately a combination of full-frame sensor and exposing to the right kept the digital noise at bay.
Canon EOS 5D Mark II, EF300mm f/2.8L IS, 1/800 sec @ f/5.6, ISO 2000, tripod, hide

Final approach
A Whiskered Tern coming in to land on Lake Tiza, Hortobagy National Park, Hungary. The birds make their nests on lily pads floating far out in the lake, safe from land-based predators.
Spending a while watching your subject before beginning to photograph can make life a lot easier. By watching how the birds flew I was able to see at what point above the water they stretched out their wings to brake, so when I was ready to photograph I knew when the best time to take the shot would be. As the Terns came in quickly, I set a high shutter speed to avoid blurring them. It was then a case of picking a single bird and following it, keeping a focus point on the head. On the Canon 1DX, setting all focus points active and choosing the initial point to start tracking (iTTR mode) when it's on the head is usually the most reliable method - the 1DX has an exceptional autofocus system and can track a moderately fast bird well. When I use a Canon 5D Mark III (and most other cameras) I set a single focus point, usually at the centre of the frame, and try to keep it on the birds head. Most people find this takes a bit of practice, so don't give up if at first you don't get sharp images. (Nikon D4S/D810 users may find that zone mode will work best for them).
Canon EOS 1DX, EF500mm f/4L IS II + 1.4x III, 1/2000 sec @ f/8, ISO 800
Home sweet home
A Hoopoe stands in front of its nest hole with a beetle.
I'd set up my main camera in a hide a few meters from the nest. To try and get shots with a variety of backgrounds I also positioned a second camera outside the hide, facing a different direction. This was linked to a Camranger wireless remote control which relayed back the image from the camera's live view to an iPad inside the hide. Camranger allowed me to set focus, aperture, shutter etc. wirelessly on an iPad. Unfortunately, the position of the camera was fixed and the Hoopoe flitted to and from it's nest without stopping in the right place. After a few hours, the Hoopoe finally landed right in front of the remote camera with its crest raised and I was able to take this shot. I used the silent shutter mode of the Canon EOS 5D Mark III, which is whisper quiet:- the Hoopoe was completely oblivious to it.
Canon EOS 5D Mark III, EF70-200mm f/2.L8 IS II, 1/500 sec @ f/3.2, ISO 1600, Camranger remote control system
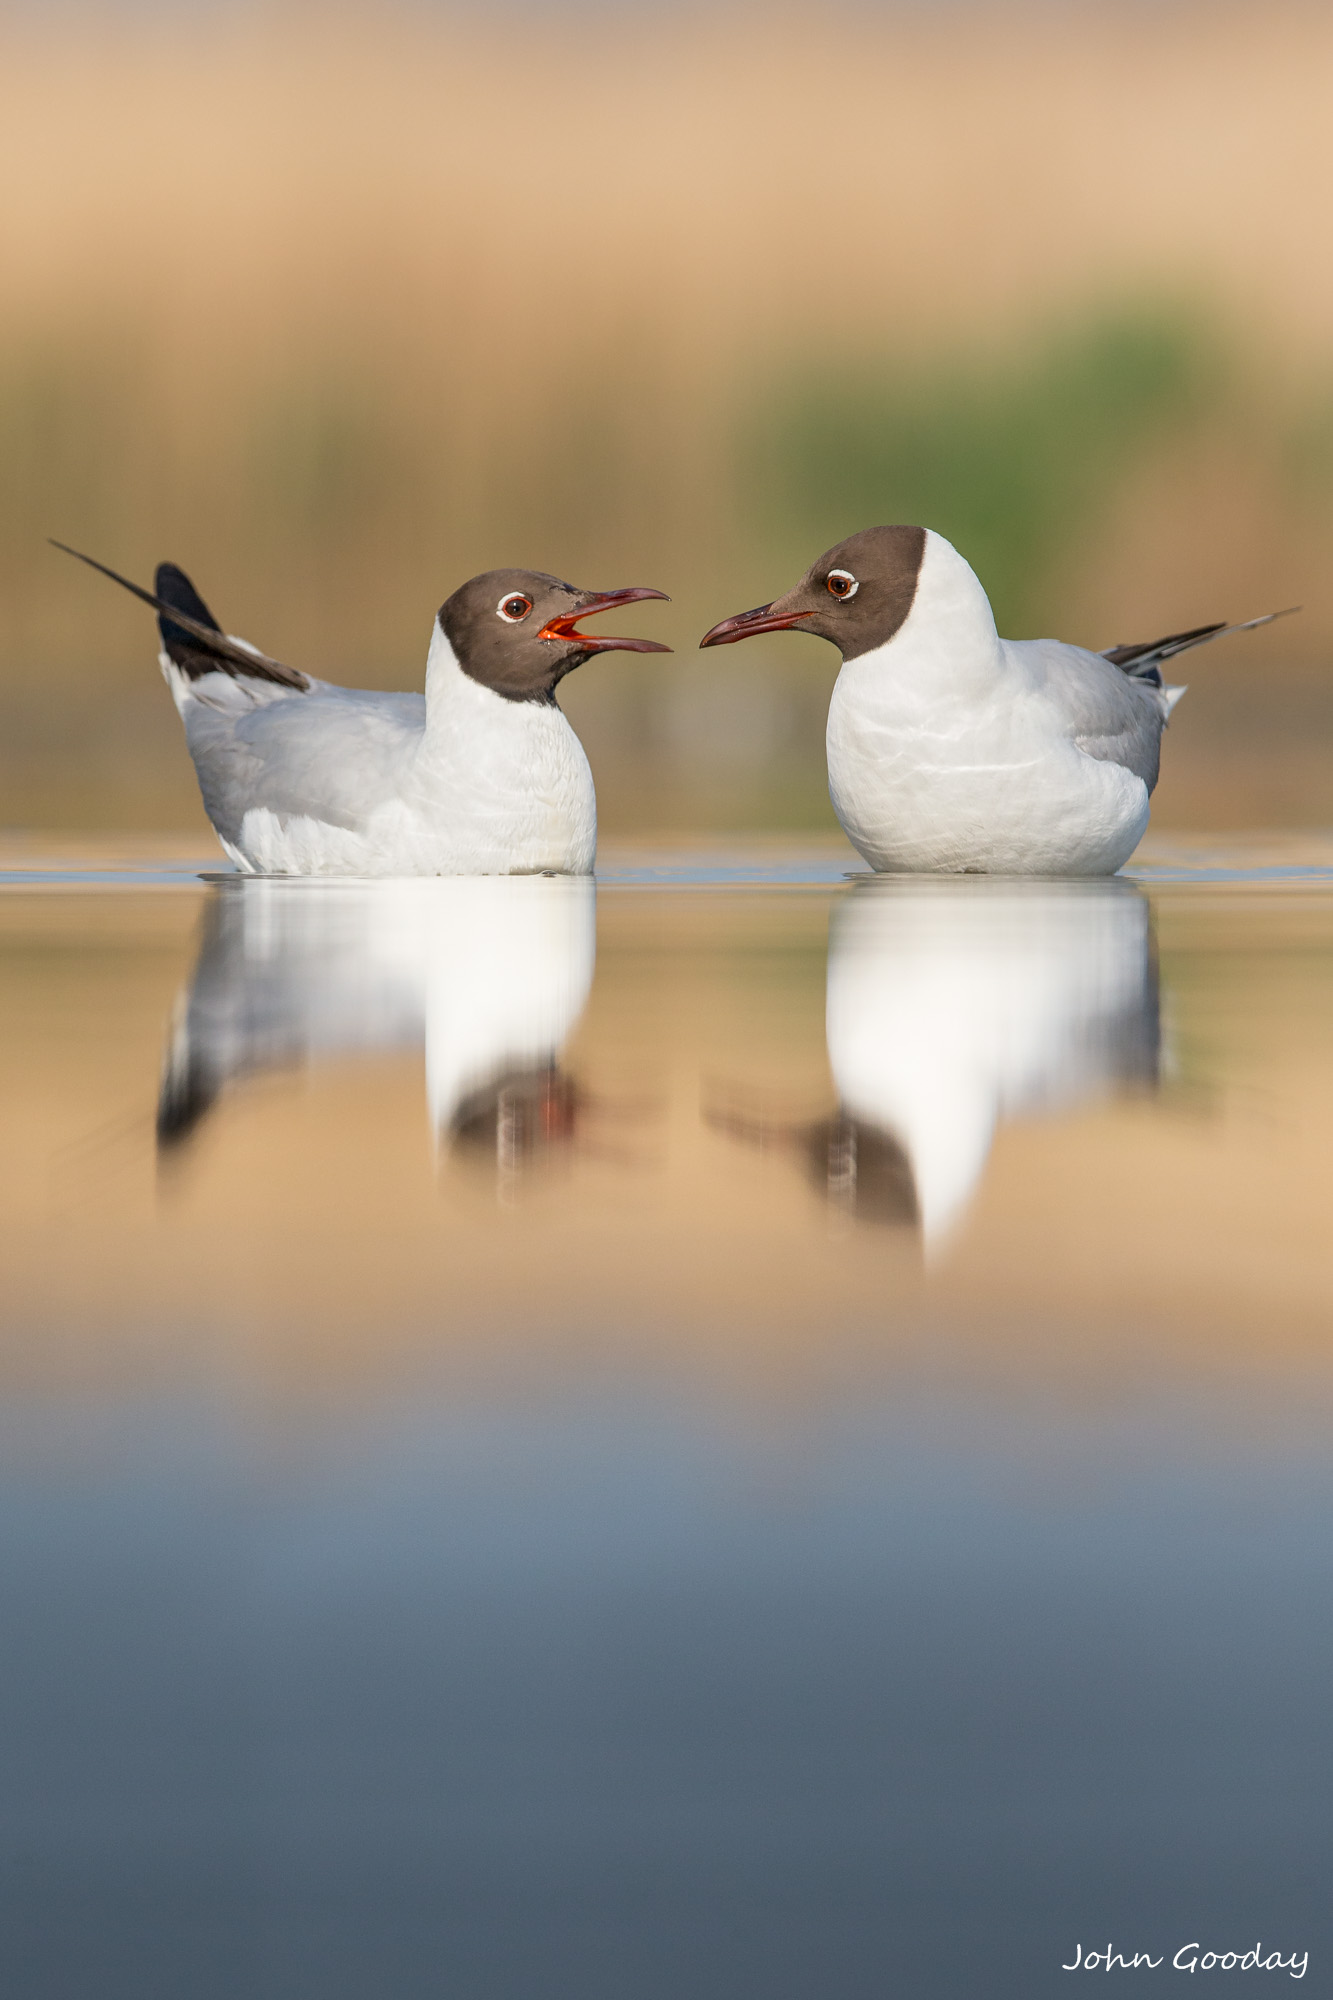
The conversation
Two Black-headed Gulls seemingly deep in conversation.
On a sunny day the quality of light (for colour photography) is usually best early in the morning and at the end of the day. The light is softer then, creating gradual tone changes instead of the harsh shadows and bright highlights that result when the sun is higher in the sky. Here, the distant reed beds were rendered a nice golden colour and reflected nicely in the lake.
The composition of this shot follows the classic rule-of-thirds principle: the horizontal colour bands intersect a third of the way up the image, the gulls are placed along imaginary lines dividing the picture into thirds, both horizontally and vertically. Most viewers find rule-of-thirds compositions more attractive than, for example, images that simply centre the subjects.
Canon 1DX, EF300mm f/2.8L IS, 1/2000 sec @ f/5.6, ISO 800, tripod, hide

Extreme fishing #2
A Great Egret manages to grab two fish in a single strike.
There is quite a bit of luck in wildlife photography, but you can improve the odds of getting lucky by maximising the amount of time spent behind the camera. That way, there's a better chance that you'll be there, ready, when something interesting happens.
I'd spent several afternoons in a hide watching Egrets and Herons fishing in a small pool. I routinely followed birds that looked ready to strike with my camera, frequently adjusting settings to match the changing light conditions. Most times that the birds struck at the water they didn't catch a fish, but occasionally they did. On this one occasion I was lucky enough to follow an Egret as it somehow managed to catch two fish with a single lunge into the water. As all the camera settings were pre-adjusted, all I had to do was press the shutter button.
Canon EOS 5D Mark III, EF300mm f/2.8L IS, 1/1600 sec @ f/6.3, ISO 1250, tripod, hide

In a flap
The island of Texel, just off the Dutch coast, is a haven for bird photographers. Every year thousands of wading birds build nests on the the waterways and many predators, such as Marsh Harriers, are attracted to the area by the prospect of young chics for dinner.
I spent a few days on the island, primarily to photograph Avocets, and every morning at dawn I headed off to the Avocet colony. One afternoon, I drove to the north of the island for a bit of a break (there are only so many thousand Avocets a man can photograph in a day before becoming a bit overloaded). While I was parking my car at one of the beaches a male pheasant appeared in the dunes and started displaying to some nearby females. Using the car as a hide, I was able to gradually work my way closer to the bird and get a few action close-ups.
Canon EOS 7D, EF500mm f/4L IS, 1/1000 sec @ f/5, ISO 640

Territorial dispute
Two Yellow-billed storks clash over nesting space in the Okavango Delta, Botswana.
Shooting from small boats can allow you to get very close to wildlife - for some reason, animals don't flee from a photographer in a boat in the way the do when you're on foot.
On the down side, a small boat is not a very stable platform so you need to take care if you want sharp images. A high shutter speed will help avoid blur caused by the rocking of the boat. Image stabilised lenses can help get a sharp picture at longer shutter speeds, so these are a favourite of mine for boat trips. Of course, close proximity to your subject means a relatively short focal length lens is often more than enough to capture frame-filling shots, such as this one shot with a hand-held 70-200mm. The short focal length magnifies the effect of the boat's movement far less than a super-telephoto would.
Canon EOS 5D Mark II, EF70-200mm f/2.8L IS II, 1/2000 sec @ f/5.6, ISO 320

Reflections
A Buzzard cooling off on a hot summer's day.
I love reflections in photos - maybe it's the symmetry they bring to an image. To get the best reflections, you need a still day, low shooting angle and a nice smooth upper background area (the distant dark tree area in this case) that doesn't clutter the image when reflected. reflection images work quite well when the image is divided 50-50 reflection-image.
Canon EOS 5D Mark III, EF70-200mm f/2.8L IS II, 1/200 sec @ f/4.5, ISO 1250, tripod, hide

Raining again
I often feel that rain adds a real atmosphere to photos, so when I'm out and the drops start falling I keep shooting. Obviously, it helps to be dressed for the weather - I like rain, but I'm definitely not keen on getting wet. Waterproof overtrousers are a definite plus (there are plenty of lightweight offerings from camping and outdoor shops that will fit easily into a a camera bag pocket), and a waterproof coat and boots are essential. If you're in the open, then a camera and lens cover is a must to keep your equipment safe from water. You can buy hard wearing camouflage covers in a range of sizes from places such as Wildlife Watching Supplies. Alternatively, Optech make cheap, specially shaped semi-disposable covers with drawstrings (available from large retailers such as Amazon for less than £10 a pair), or you can use plastic garbage sacks and secure them with elastic bands or velcro strips - clear bags work best as you can see the camera controls through them.
Canon EOS 1DX, EF70-200mm f/2.8L IS II, 1/1000 sec @ f/2.8, ISO 2000, tripod, hide

Patrolling
A Kori Bustard strolls on the plains of Nxai Pan National Park, Botswana
The Kori Bustard has the distinction of being the worlds heaviest flying bird. Not that they fly much - I've rarely seen one leave the ground, and even then only for a few seconds.
Using early evening golden light can work wonders for a photo, adding warm tones to what would otherwise have been a fairly bleak scene. Knowing that water is very scarce in Nxai Pan, I staked out one of the few waterholes every evening to catch a variety of animals coming to drink before darkness fell.
Canon EOS 7D, EF100-400mm f/4.5-5.6L IS, 1/400 sec @ f/8, ISO 400, beanbag

Fiery egret
Little Egret back-lit in late afternoon sunlight.
Back-lighting can seem daunting at first. It's all to easy to end up with a photo that's not quite a silhouette, but is still too dark to make out the subject clearly against a bright background. Wedding photographers have been dealing with just this sort of lighting situation for years when photographing bridal parties on sunny days. They don't want their subjects to face the sun as that would make them squint so and they usually fix the problem by using a flashgun, or a reflector, to illuminate the dark front of the happy couple. Sadly, flashguns aren't always practical with wildlife which may be too far away for the flash to make much difference. It's also not very practical to wave a big reflector around to bounce sunlight back to the subject as that rather negates all the trouble you've gone to to conceal yourself from the animal.
However, there is one large natural reflector that you can use: a body of water. Water has the happy habit of reflecting light very well and by photographing animals on the edge of lakes, some natural light will bounce back onto your subject and help illuminate the side facing you. This also has the advantage that it's the same kind of light (the same colour temperature) as all the other light in the picture, so you don't have to worry about using gel filters on flashes to try and match their contribution with the ambient light.
This technique works best with large bodies of water (a puddle won't make much difference to a back-lit swan). It's often best to use spot-meter mode to set exposure for the subject. I often dial in a bit of negative exposure compensation to slightly darken the subject to emphasis the rim of light on the feathers or fur at the subjects edge. Keep the highlight warning set on your cameras playback to make it easier to see if you've overexposed the image (a few spots of pure white around the edge of the subject are usually fine). Dark backgrounds usually work best (the brighter the sunlight, the darker the background that you need for this to be effective - a light background will usually burn out when you set exposure for the subject in midday sun.) It's a good idea to keep the sun itself out of your image, unless you want a lot of lens flare. And speaking of lens flare, if you want to avoid it then it's best to use a lens hood and to make sure that your lens and any filters you are using are clean and free from dust. Depending on the angle of the sun, you can get some nice internal lens patterns (the roundish shapes in the water in the image above).
It's easiest to back-light effectively when the sun isn't at it's brightest, so shooting early in the morning and late in the afternoon is a good way to get started. You don't have to use water as the only reflector - with winter coming up, don't forget that other great natural reflector when shooting back-lit images: snow.
Canon EOS 5D Mark III, EF300mm f/2.8L IS + 1.4x III, 1/2000 sec @ f/5, ISO 1250, tripod, hide

Early morning rain
Black-crowned Night Heron in pre-dawn light.
In the semi-darkness of pre-dawn, this Night Heron was illuminated by halogen floodlights. Halogen light gives a warm orange colour-cast to an image if you let the camera manage white balance. To remove the cast, the white balance on the camera is set to a low value (2800k). This has the effect of strengthening the blues in the cold natural ambient light. A high shutter speed was used to freeze the Heron and capture the rounded splashes of rain water on the surface of the lake.
Canon EOS 1DX, EF70-200mm f/2.8L IS II, 1/800 sec @ f/4, ISO 2000, 2 x 1000W halogen floodlights tripod, hide

Sunset in the marsh
Great Egret, Kiskunsagi National Park, Hungary.
To get a nice silhouette it's often necessary to under-expose the image by 1 - 2 stops. As luck would have it, this also has the side-effect of saturating colours more, which can really emphasise the sky colour in a sunset. You can also set the white balance of the camera to cloudy, or even shade, to super-saturate oranges and reds. This is a matter of taste / personal preference. If you shoot raw images, rather than jpegs, it's very easy to undo the effects of these setting later by resetting the colour temperature in your raw editing software (e.g. Lightroom, Aperture, Capture One etc.) Silhouettes need to be really sharp - there's no detail in the black shape of the subject, so the eye is drawn to its outline (that's just the way our brains work) and any softness there will be noticed. It's best to keep the shutter speed reasonably high to avoid motion blur, and use a sturdy tripod.
The closer you are to water level, the better the reflections will be. For a perfect reflection in water you'll need an absolutely calm day, and a motionless subject.
Canon EOS 5D Mark III, EF70-200mm f/2.8L IS II, 1/400 sec @ f/4.5, ISO 800, tripod, hide.

Reflecting
A Sparrowhawk takes a bath in a woodland pool.
Reflections add a nice symmetry to an image. To add a little visual tension I positioned the shore a little higher than halfway in the frame, rather than simply dividing the image in two. This also allowed me to include the dark water areas at the bottom of shot to help create the impression of a frame boundary.
Canon EOS 5D Mark II, EF300mm f/2.8L IS, 1/1000 sec @ f/3.2, ISO 400, tripod, hide

The wider view
The shot above is a wide-angle close-up taken at the end of the day at16mm focal length. The Puffins are fairly relaxed around people and I found that if I sat down on the path after a while some of them would wander over to see what I was doing (the softbox on my flash gun seemed to particularly interest them). I certainly wouldn't condone chasing them around to get the picture as this would distress the birds. I used a small aperture (f/16) to create the diffraction effect around the sun - wide angle zoom lenses are especially good for getting this effect which essentially exploits a flaw in the optics of the lens. Generally, I shoot these sort of images in manual exposure mode, adjusting the ISO and shutter speed until I get the right exposure in the sky. You can, of course, use Aperture or Shutter priority exposure mode, dialling in negative exposure compensation to get the sky to the right level. However, this may be prone to changing as you move viewpoints and the camera (mis)interprets the light from a slightly different angle. Once I'd got the sky and sun looking the way I wanted, I set about compensating for the resulting underexposure of the Puffin and grass. To do this I added extra light via fill-in flash on foreground with a Speedlight. This had to be gelled to match the colour temperature of the evening light via a CTO filter on the flash head (using an ungelled flash would have given the foreground and Puffin a bluish colour cast compared to the orange evening light). I used a small 30cm softbox on the flash to give a softer light than I'd have got with the bare flash head (a bigger softbox would have been even better but I neglected to take one with me). In this shot the flash was mounted directly on top of the camera - this works for fill-in flash when the sun is more or less directly in front of you. For fill in flash, using the ETTL flash mode on the camera usually works quite well if you spot meter on the subject. However, you may need to dial the power up or down a bit using flash exposure compensation if the light conditions fool the camera's metering system. The flash will generally be firing at fairly low power, especially late in the day when the sun is more subdued (while I was shooting, somebody came over to tell me that they thought my flash might not be working properly as the output was barely visible). You don't want too much flash otherwise the image will appear false.
Canon EOS 1DX, EF16-35mm f/2.8L IS II, 1/250 sec, f/16, ISO 250, EX600-RT Speedlight with CTO gel and 30cm softbox
Birds